学生のプロジェクトでYunを使う機会があり、以下のようなお勉強をしたことがありました。
Arduino YÚN でサンプル(Temperature Web Panel)を動かすまでの作業ログ - memorandums
Yunは普通のArduinoとは異なり、Linuxが動作するチップが載っています。購入したときはそこまで意識していなくてWifi使えて便利という程度の認識でした。実際に上記のようにサンプル程度は動かせたのですが、実際に自分でプログラムを書くとなるとそれなりに理解しなければなりません。
まだまだ理解は浅いと思いますが、とりあえずTemperature Web Panelのサンプルの動作は理解できました。理解のために参考にしたのは以下の公式ページです。英語ですが、Yunを使う人はまずここをがんばって熟読すべきでしょう。
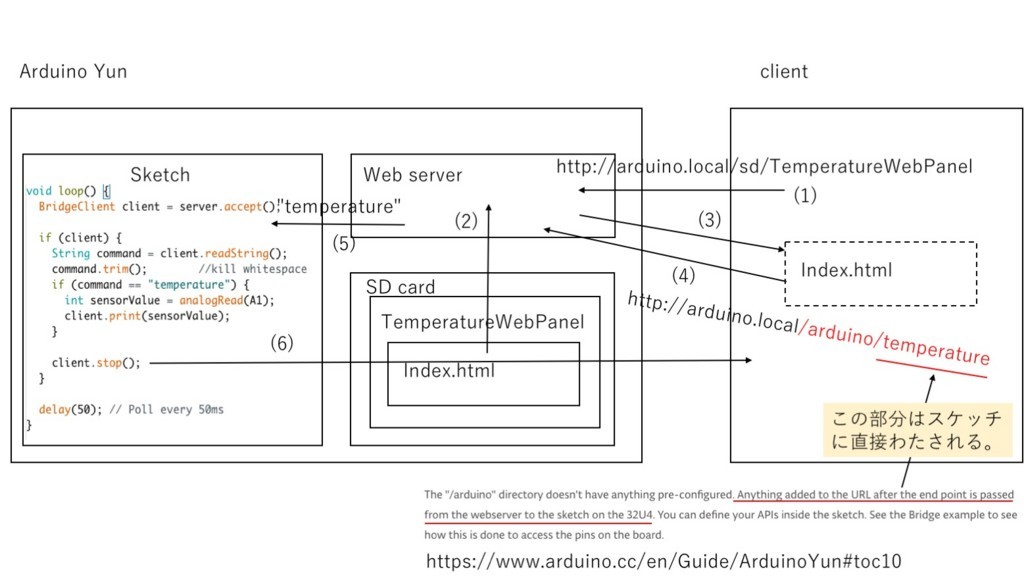
で、肝心の図説は以下の通りです。

一応、流れを説明しますね。
(1)クライアント(ブラウザ)でhttp://arduino.local/sd/TemperatureWebPanelにアクセスします。
(2)(3)Yunに搭載されたhttpサーバーがSDカードのTemperatureWebPanel内のindex.htmlを探し、あればクライアントに返します。
(4)(5)index.htmlでは、2秒周期でhttp://arduino.local/arduino/temperatureにアクセスします。上記の図にある通り、Yunでは/arduinoと書くと、それ以降の文字列をスケッチに直接渡す仕様になっているそうですので、Yunに転送済みのスケッチ(TemperatureWebPanel.ino)でその文字列を取得します(client.readString()というところですね)。
(6)スケッチでクライアントから送られてきた文字列をパースして、所定の文字列(temperature)であれば、センサーの値を読んで、クライアントに返します。
この場合は、センサーの値をWebページに表示するためindex.htmlを利用していますが、例えば、学生プロジェクトではProcessingでアクセスしますので、
http://arduino.local/arduino/temperatureにアクセスすることでセンサーの値をそのまま取り出すこともできます。ちなみにセンサーの値を取り出すだけであればRESTが定義されていますのでそれを利用すべきでしょう。例えば、http://arduino.local/arduino/analog/2という感じですね。スケッチでセンサーの値を判断して何か処理した結果をクライアントに返したい場合はhttp://arduino.local/arduino/temperatureのままがいいでしょう。はい。
上記の登場人物であるスケッチ(TemperatureWebPanel.ino)とindex.htmlを参考まで以下にあげておきます。
TemperatureWebPanel.ino
/* Temperature web interface This example shows how to serve data from an analog input via the YunShield/Yún built-in webserver using the Bridge library. The circuit: * TMP36 temperature sensor on analog pin A1 * SD card attached to SD card slot of the YunShield/Yún This sketch must be uploaded via wifi. REST API must be set to "open". Prepare your SD card with an empty folder in the SD root named "arduino" and a subfolder of that named "www". This will ensure that the Yún will create a link to the SD to the "/mnt/sd" path. In this sketch folder is a basic webpage and a copy of zepto.js, a minimized version of jQuery. When you upload your sketch, these files will be placed in the /arduino/www/TemperatureWebPanel folder on your SD card. You can then go to http://arduino.local/sd/TemperatureWebPanel to see the output of this sketch. You can remove the SD card while the Linux and the sketch are running but be careful not to remove it while the system is writing to it. created 6 July 2013 by Tom Igoe This example code is in the public domain. http://www.arduino.cc/en/Tutorial/TemperatureWebPanel */ #include <Bridge.h> #include <BridgeServer.h> #include <BridgeClient.h> // Listen on default port 5555, the webserver on the Yún // will forward there all the HTTP requests for us. BridgeServer server; String startString; long hits = 0; void setup() { SerialUSB.begin(9600); // Bridge startup pinMode(13, OUTPUT); digitalWrite(13, LOW); Bridge.begin(); digitalWrite(13, HIGH); // using A0 and A2 as vcc and gnd for the TMP36 sensor: pinMode(A0, OUTPUT); pinMode(A2, OUTPUT); digitalWrite(A0, HIGH); digitalWrite(A2, LOW); // Listen for incoming connection only from localhost // (no one from the external network could connect) server.listenOnLocalhost(); server.begin(); // get the time that this sketch started: Process startTime; startTime.runShellCommand("date"); while (startTime.available()) { char c = startTime.read(); startString += c; } } void loop() { // Get clients coming from server BridgeClient client = server.accept(); // There is a new client? if (client) { // read the command String command = client.readString(); command.trim(); //kill whitespace SerialUSB.println(command); // is "temperature" command? if (command == "temperature") { // get the time from the server: Process time; time.runShellCommand("date"); String timeString = ""; while (time.available()) { char c = time.read(); timeString += c; } SerialUSB.println(timeString); int sensorValue = analogRead(A1); // convert the reading to millivolts: float voltage = sensorValue * (5000.0f / 1024.0f); // convert the millivolts to temperature celsius: float temperature = (voltage - 500.0f) / 10.0f; // print the temperature: client.print("Current time on the Yún: "); client.println(timeString); client.print("<br>Current temperature: "); client.print(temperature); client.print(" °C"); client.print("<br>This sketch has been running since "); client.print(startString); client.print("<br>Hits so far: "); client.print(hits); } // Close connection and free resources. client.stop(); hits++; } delay(50); // Poll every 50ms }
<!DOCTYPE html>
<html>
	<head>
	<script type="text/javascript" src="zepto.min.js"></script>
	  <script type="text/javascript">
	   	function refresh() {
		  	$('#content').load('/arduino/temperature');
	  	}
</script>

	</head>
	<body onload="setInterval(refresh, 2000);">
		<span id="content">0</span>
	</body>
</html>